Would you like to sign out?

Select Country

  • Afghanistan English
  • Albania English
  • Algeria English
  • American Samoa English
  • Andorra English
  • Angola English
  • Anguilla English
  • Antarctica English
  • Antigua and Barbuda English
  • Argentina Español
  • Armenia English
  • Aruba English
  • Australia English
  • Austria English
  • Azerbaijan English
  • Bahamas English
  • Bahrain English
  • Bangladesh English
  • Barbados English
  • Belarus English
  • Belgium English
  • Belize English
  • Benin English
  • Bermuda English
  • Bhutan English
  • Bolivia Español
  • Bosnia and Herzegovina English
  • Botswana English
  • Bouvet Island English
  • Brazil Español
  • British Indian Ocean Territory English
  • British Virgin Islands English
  • Brunei English
  • Bulgaria English
  • Burkina Faso English
  • Burundi English
  • Cambodia English
  • Cameroon English
  • Canada English
  • Cape Verde English
  • Caribbean Netherlands English
  • Cayman Islands English
  • Central African Republic English
  • Chad English
  • Chile Español
  • Christmas Island English
  • Cocos (Keeling) Islands English
  • Colombia Español
  • Comoros English
  • Congo English
  • Cook Islands English
  • Costa Rica Español
  • Côte d’Ivoire English
  • Croatia English
  • Cuba Español
  • Curaçao English
  • Cyprus English
  • Czech Republic English
  • Democratic Republic of the Congo English
  • Denmark English
  • Djibouti English
  • Dominica English
  • Dominican Republic Español
  • Ecuador Español
  • Egypt English
  • El Salvador Español
  • Equatorial Guinea English
  • Eritrea English
  • Estonia English
  • Ethiopia English
  • Falkland Islands English
  • Faroe Islands English
  • Fiji English
  • Finland English
  • France English
  • French Guiana Español
  • French Polynesia English
  • French Southern Territories English
  • Gabon English
  • Gambia English
  • Georgia English
  • Germany English
  • Ghana English
  • Gibraltar English
  • Greece English
  • Greenland English
  • Grenada English
  • Guadeloupe Español
  • Guam English
  • Guatemala Español
  • Guernsey English
  • Guinea English
  • Guinea-Bissau English
  • Guyana English
  • Haiti Español
  • Heard Island and McDonald Islands English
  • Honduras Español
  • Hong Kong English
  • Hungary English
  • Iceland English
  • India English
  • Indonesia English
  • Iran English
  • Iraq English
  • Ireland English
  • Isle of Man English
  • Israel English
  • Italy English
  • Jamaica English
  • Japan 日本語
  • Jersey English
  • Jordan English
  • Kazakhstan English
  • Kenya English
  • Kiribati English
  • South Korea 한국어
  • Kuwait English
  • Kyrgyzstan English
  • Laos English
  • Latvia English
  • Lebanon English
  • Lesotho English
  • Liberia English
  • Libya English
  • Liechtenstein English
  • Lithuania English
  • Luxembourg English
  • Macau English
  • Madagascar English
  • Malawi English
  • Malaysia English
  • Maldives English
  • Mali English
  • Malta English
  • Marshall Islands English
  • Martinique Español
  • Mauritania English
  • Mauritius English
  • Mayotte English
  • Mexico Español
  • Micronesia English
  • Moldova English
  • Monaco English
  • Mongolia English
  • Montenegro English
  • Montserrat English
  • Morocco English
  • Mozambique English
  • Myanmar English
  • Namibia English
  • Nauru English
  • Nepal English
  • Netherlands English
  • New Caledonia English
  • New Zealand English
  • Nicaragua Español
  • Niger English
  • Nigeria English
  • Niue English
  • Norfolk Island English
  • Northern Mariana Islands English
  • Norway English
  • Oman English
  • Pakistan English
  • Palau English
  • Palestine English
  • Panama Español
  • Papua New Guinea English
  • Paraguay Español
  • Peru Español
  • Philippines English
  • Pitcairn Islands English
  • Poland English
  • Portugal Español
  • Puerto Rico Español
  • Qatar English
  • Réunion English
  • Romania English
  • Russia English
  • Rwanda English
  • Saint Barthélemy Español
  • Saint Helena English
  • Saint Kitts and Nevis English
  • Saint Lucia English
  • Saint Martin Español
  • Saint Pierre and Miquelon English
  • Saint Vincent and the Grenadines English
  • Samoa English
  • San Marino English
  • Sao Tome and Principe English
  • Saudi Arabia English
  • Senegal English
  • Serbia English
  • Seychelles English
  • Sierra Leone English
  • Singapore English
  • Sint Maarten English
  • Slovakia English
  • Slovenia English
  • Solomon Islands English
  • Somalia English
  • South Africa English
  • South Georgia English
  • South Sudan English
  • Spain Español
  • Sri Lanka English
  • Sudan English
  • Suriname English
  • Svalbard and Jan Mayen English
  • Eswatini English
  • Sweden English
  • Switzerland English
  • Syria English
  • Taiwan English
  • Tajikistan English
  • Tanzania English
  • Thailand English
  • Togo English
  • Tokelau English
  • Tonga English
  • Trinidad and Tobago English
  • Tunisia English
  • Turkey English
  • Turkmenistan English
  • Turks and Caicos Islands English
  • Tuvalu English
  • U.S. Virgin Islands English
  • Uganda English
  • Ukraine English
  • United Arab Emirates English
  • United Kingdom English
  • United States of America English
  • U.S. Minor Outlying Islands English
  • Uruguay Español
  • Uzbekistan English
  • Vanuatu English
  • Vatican City English
  • Venezuela Español
  • Vietnam English
  • Wallis and Futuna English
  • Western Sahara English
  • Yemen English
  • Zambia English
  • Zimbabwe English
  • Åland Islands English
  • East Timor English
  • Netherlands Antilles English
  • Serbia and Montenegro English
  • North Macedonia English
  • Timor-Leste English
Structure

nGen Link for Revit Structure

BLOG PROJECT TUTORIAL

OVERVIEW

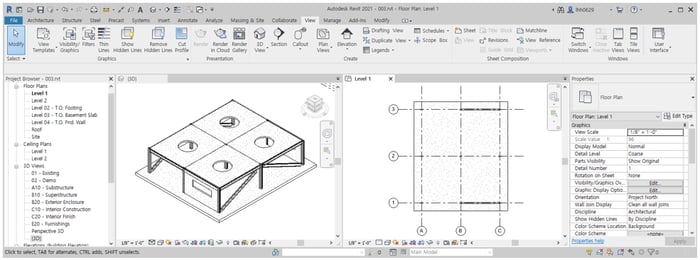
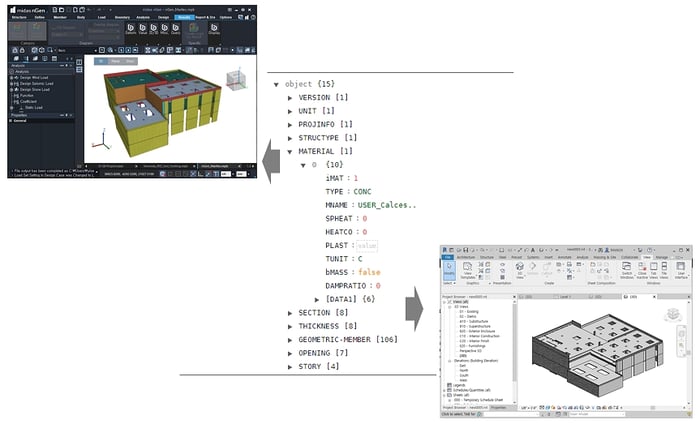
Using Midas Link, direct data transfer between midas nGen and Revit Structure is available for Building Information Modeling(BIM) workflow. Midas Link for Revit Structure enables us to directly transfer a Revit model data to midas nGen, and deliver back to the Revit model. For compatibility with Revit Structure, Midas nGen text file(*.json) is used for the roundtrip. This function is provided as an Add-In module.


Table of Contents

1. Getting Started (Revit → nGen)

2. Getting Started (nGen → Revit)


Midas Link for Revit Structure supports the following workflows : 

1) Send the analytical model of Revit Structure to midas nGen.
2) Import the JSON file of the Revit model in midas nGen
3) Export the model of nGen to the JSON file.
4) Import the JSON file in Revit Structure as analytical model.


ngen link for revit


1. Getting Started (Revit → nGen)


The following exercise leads you through a sample scenario providing detailed instructions for each step in the process.


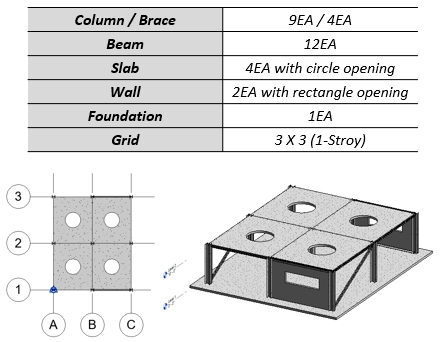
STEP 1 : Import or Create the Revit model

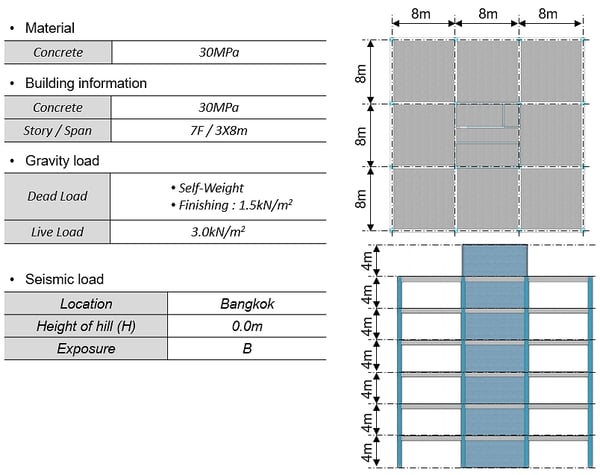
In the example model, created following members, as shown.
 

nGen Link for Revit Structure


STEP 2 : Run "Export to nGen"


nGen Link for Revit Structure

nGen Link for Revit Structure

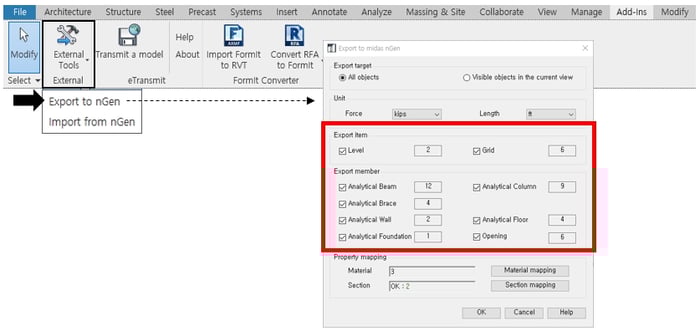
 ⋅ Add-Ins > External > External Tools > Export to nGen

 ⋅ Check an exporting item (Grid information) and member (No. for Member) of

   dialog box.


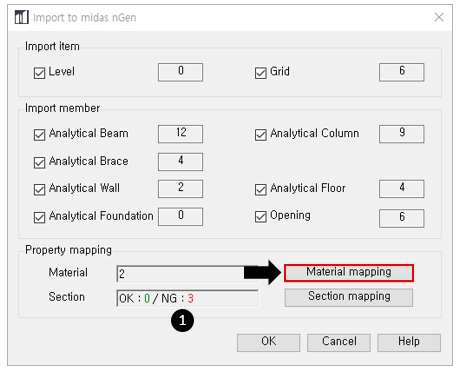
STEP 3 : Click "Material Mapping"

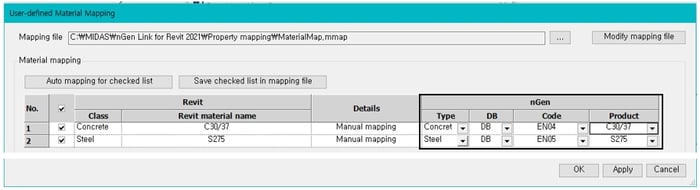
 ⋅ Set nGen material information for each material in Revit.
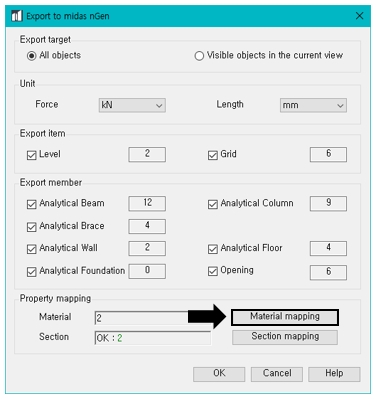
 

nGen Link for Revit StructurenGen Link for Revit Structure

 ⋅ Select a product (Selecting order : Type > DB > Code > Product).

 ⋅ In the case of selecting "User" in DB, Material with arbitrary values is created in midas nGen.

 ⋅ Auto mapping for checked list : Allocate materials according to the DB provided by nGen automatically.

 ⋅ Save Checked list in mapping file : The information by allocating by manual can be used automatically at next time.


STEP 4 : Click "Section Mapping"

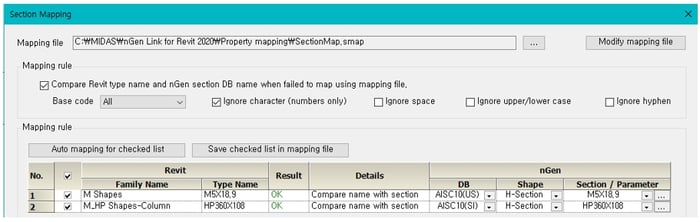
 ⋅ Sets the section information of nGen for each section of Revit.
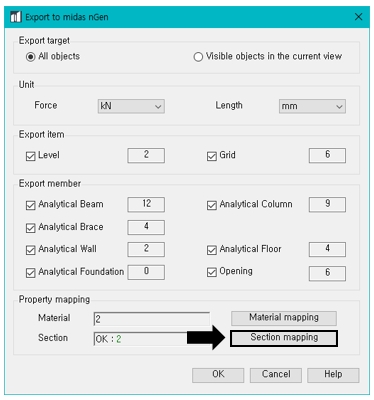
 

nGen Link for Revit StructurenGen Link for Revit Structure

 ⋅ Select a section (Selecting order : DB (CODE) > Shape > Section / Parameter).

 ⋅ In case of selecting "User" in DB, Section mapping data is entered using section parameters between Revit and midas nGen. 


 ⋅ Define a section mapping for "User" DB.
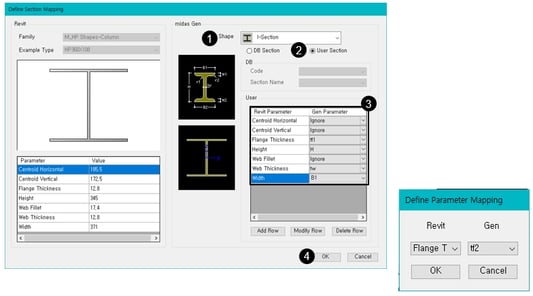
 

nGen Link for Revit Structure

 1. Select a section shape.

 2. Select "User Section".

 3. Connect Fen parameter with Revit Parameter.

     - Connect "Ignore" for unnecessary Revit parameters.

 4. Click "OK".

       ⋅ Add row : Add mapping information in the table.


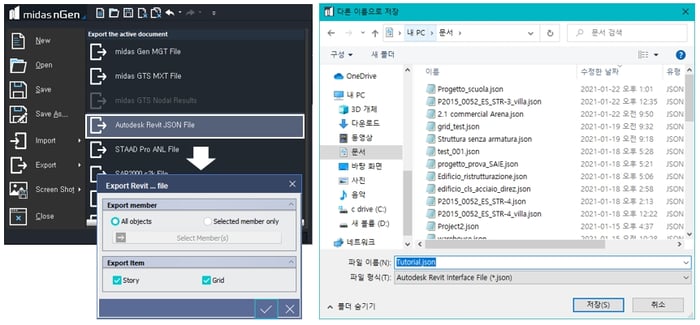
STEP 5 : Save as Json file

 ⋅ Enter new name and save as Json format file.
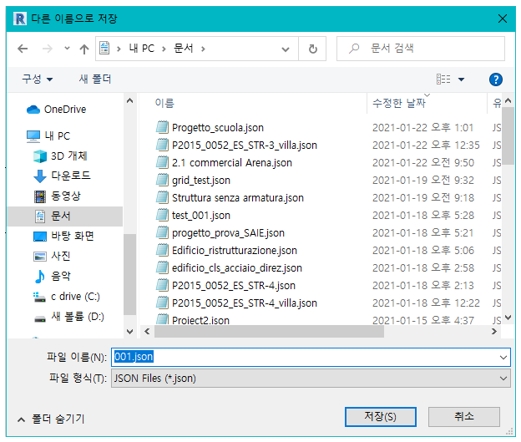
 

nGen Link for Revit Structure


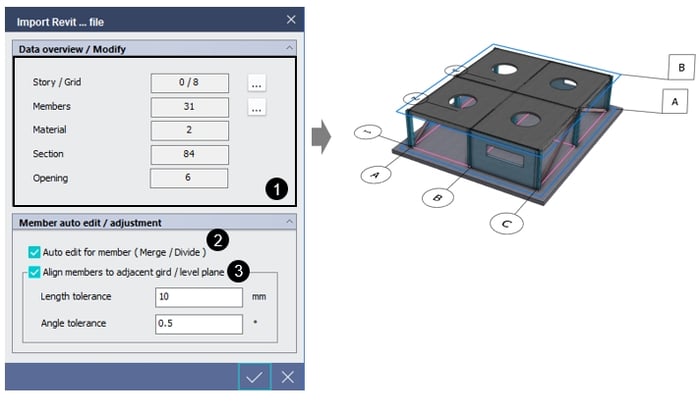
STEP 6 : Import Json file in nGen

 ⋅ midas nGen > Import > Autodesk Revit Json File.
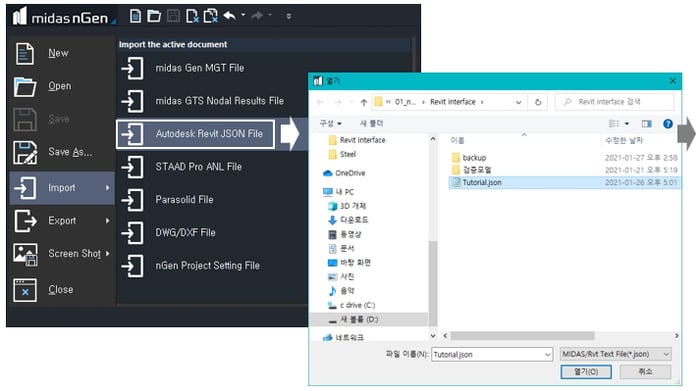
 

nGen Link for Revit StructurenGen Link for Revit Structure

 1. Check the importing data.

 2. Automatically edit parts to match nGen format.

 3. Match the position of the part to the grid according to the value of tolerance.


2. Getting Started (nGen → Revit)


The following exercise leads you through a sample scenario providing detailed instructions for each step in the process.


STEP 1 : Import or Create the nGen model

 ⋅ In the example model, created following members, as shown.
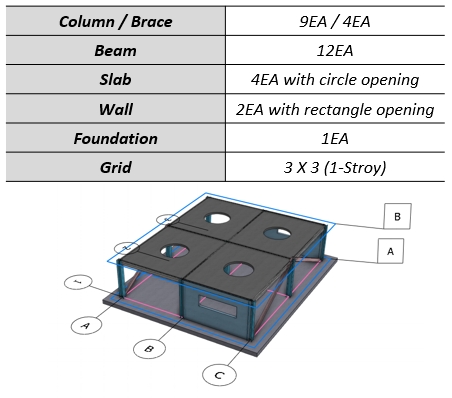


nGen Link for Revit Structure


STEP 2 : Export nGen model


nGen Link for Revit Structure

 ⋅ midas n Gen > Export > Autodesk Revit Json File.

 ⋅ Select the items to be exported and save as new name.


STEP 3 : Import or Create the nGen model
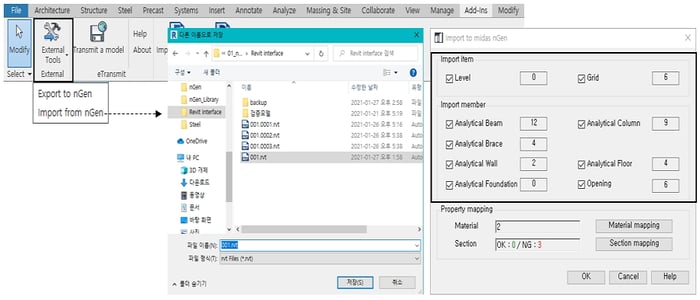
 

nGen Link for Revit Structure

 ⋅ Add-Ins > External >External Tools > Import from nGen.

 ⋅ Check an importing item (Grid information) and member (No. for Member) of 

   dialog box after saving as a new project.


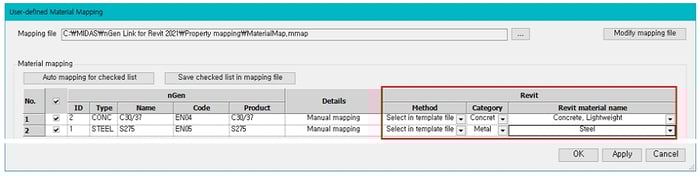
STEP 4 : Click "Material Mapping"

 ⋅ Sets the material information of Revit for each nGen material.
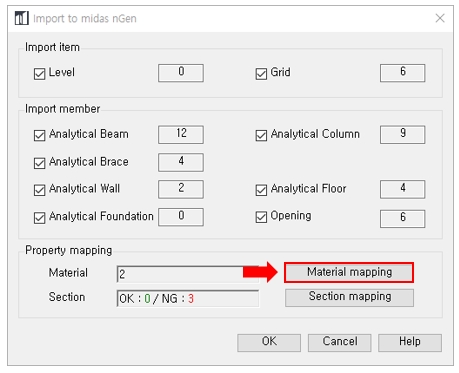
 

nGen Link for Revit StructurenGen Link for Revit Structure

 ⋅ Select a material name (Selecting order : Method > Category > Revit material name).

 ⋅ In case of selecting " Creating new material" in Mehod, The default material is matched according to the material type.


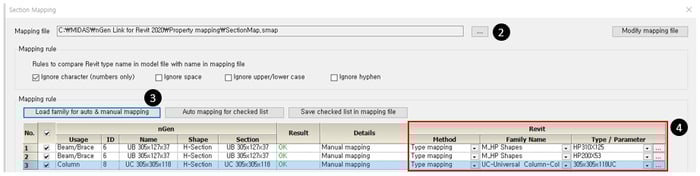
STEP 5 : Click "Section Mapping"

 ⋅ Sets the section information of Revit for each section of nGen.
 

nGen Link for Revit StructurenGen Link for Revit Structure

 1. OK : Number of cross-sections with matching cross-section information.

    NG : The number of cross-sections that did not find matching cross-section information for the nGen section

 2. Location of DB for automatic mapping of section.

 3. If the desired name cannot be found in Family Name, an external Family DB can be added.

 4. "..." : You can manually assign dimensions to the selected family name.


STEP 6 : Import and check model information

 ⋅ Click "OK" button.
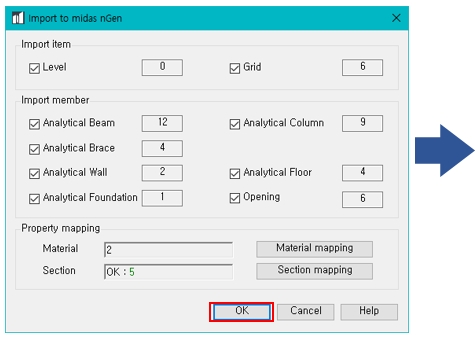
 

nGen Link for Revit StructurenGen Link for Revit Structure


Note

The following table shows the Revit components that are sent to midas nGen.
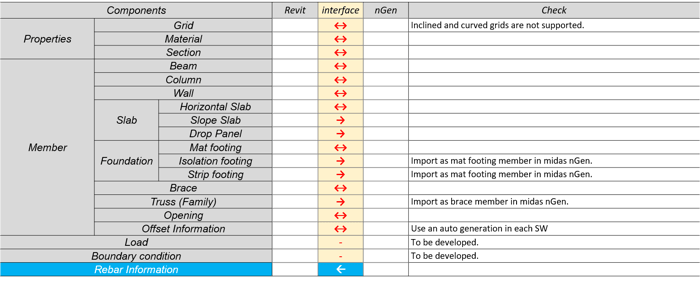
 

16_Revit_nGen_interface


Subscribe to Newsletter

Catch the weekly engineer news!

Young-il Seo
Yeong-il Seo | Principal Structural Engineer

Young-il has over 13+ years of experience in building design, especially high-rise buildings with column reduction analysis, plant structures, pushover analysis, health monitoring, and vibration control projects. Since 2016, he is planning and providing technical supports for midas building products such as midas Gen, nGen, and Design+.

E-BOOK Eurocode2 Design
Guide

This Design Guide provides a comprehensive guide for RC design
as per Eurocode2-1-1:2002. This book is helpful in understanding
the Eurocode design concept.

What you may
also like

Subscribe to Newsletter

Catch the weekly engineer news!